1. Leave Types
Custom leave types and allowances
Everything you need to know about using Hrvey
This guide tells you how to set time off allowances in Hrvey so you and your employees can keep track of how many days off they have left. Note that allowances are a Premium feature - on the free tier, you can only track the amount of time off, but not how much of the allowance is left. Time off and allowances in Hrvey are tracked with a granularity of half days.
It is also possible to set up carry over (allowing unused allowance to carry over to the next year) and expiration of unused carry over - see this guide.
It is furthermore possible to configure accrual, so the allowance becomes available bit by bit at then end of each month - see this guide after you are done with this one.
In Hrvey each leave type can optionally have an associated allowance that it is deducted from. This can either be an allowance just for that leave type (e.g. if Vacation has its own allowance), or share in the allowance from another leave type (e.g. if Vacation and Sick Leave should both be deducted from the shared PTO allowance)
By default, the Vacation leave type uses an allowance, but this is fully customizable. You can see which leave types you have, customize them and configure which should use allowances on the Leave Types page. You can read more about how to set them up in this article.
Once you have one or more leave types set up to use an allowance, it’s time to set how much allowance (how many days off) should be available each leave year. This can be done in two places:
In both cases, you can set the allowance for the current and next leave year. The value you set for the next leave year will also be used as the template for future leave years.
To set the default allowances for an office, find the office on the Offices page and click ‘Edit’.
A bit down the page you should see a box with the allowances for the current and next for each leave type that has an allowance (if you don’t see the box, you need to configure one or more leave types to use an allowance as described in this article)
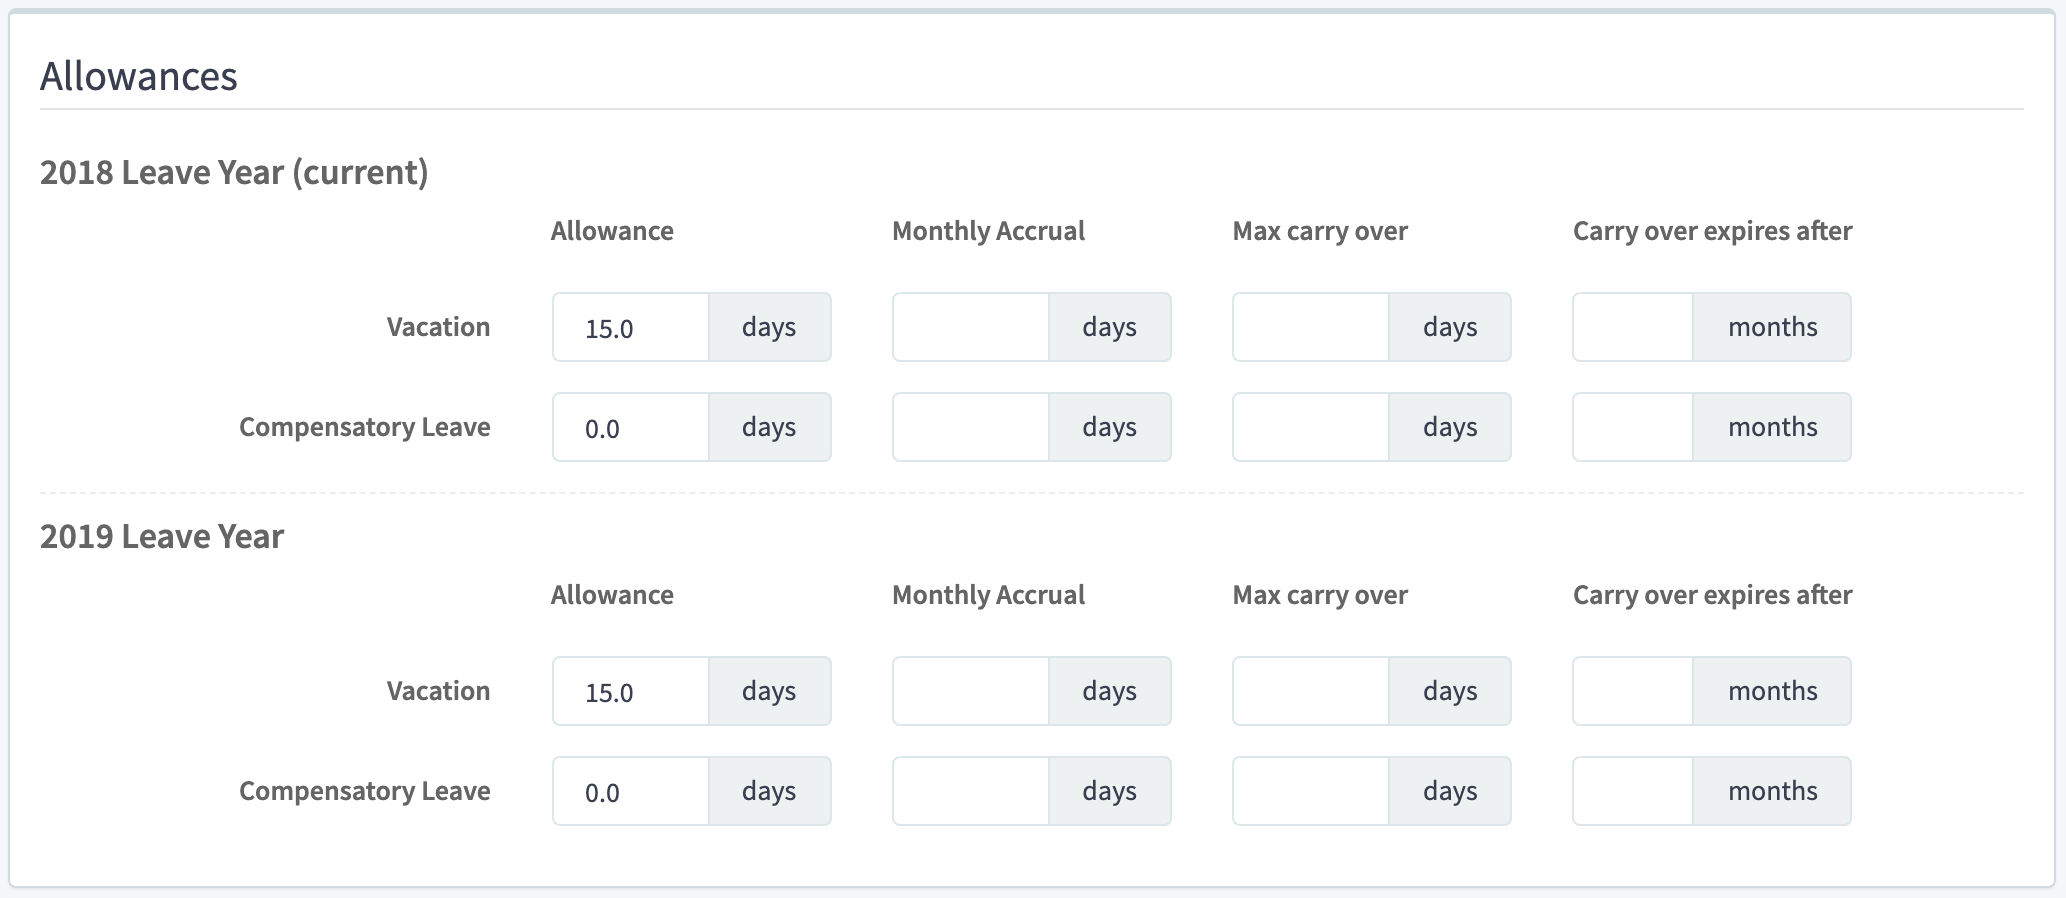
Don’t forget to click save at the top right when you are done. Note that the allowance for the next leave year is also used as the template for future years.
Note that allowances can only be set for leave types that are available at this office. So if you want to set an allowance for a leave types that is currently unavailable at this office, you’ll first have to make it available by checking the checkbox in the panel named Available Leave Types and then saving.
To override the default allowance from the office, go to the profile page of an employee by clicking their name in the Employees list, then click ‘Edit’ at the top right. Now, in the lefthand side of the page you can see the allowances for the current and next leave year.
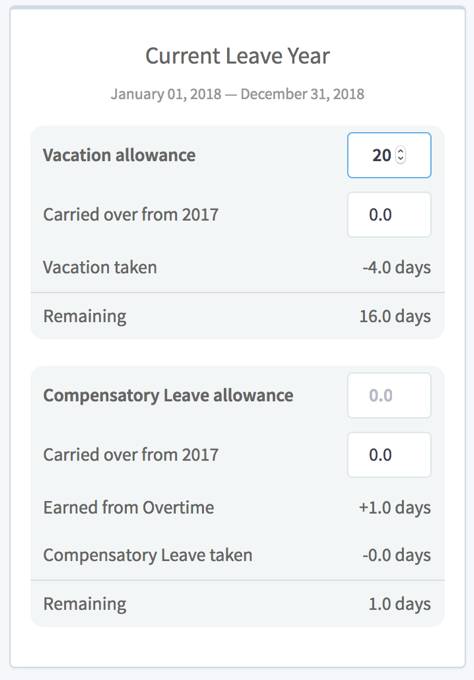
Numbers written with a lighter grey are the defaults from the office. You can override any of these by entering a number or clicking the small up- or down-arrows. Conversely you can remove an override (so it goes back to the default value from the office) by selecting the entered number and deleting it with the delete or backspace key on your keyboard.
As with the office, the allowances entered for the coming leave year will also serve as a template for future leave years - so it is easy to e.g. override the amount of allowance for an employee in their first year of employment, but let them get the default allowance from the office in future years.
In addition to main allowance, employees may have carried over allowance from the year before (the carryover can also be edited if needed), and they may accumulate extra time off as a compensation for working overtime (see this article if you want to enable this).
As always, don’t forget to click ‘Save’ at the top right when you are done.
If you have any further questions, feel free to write us at support@hrvey.com
If you don’t already have an account you can learn more and sign up for free at hrvey.com
Custom leave types and allowances
Set up how much time off employees may take.
Tracking overtime work and automatically granting extra time off
Set the monthly rate at which allowance accrues
Set how much unused allowance can be carried over to the next leave year and if it should expire after a while if it is still not used.